Combinational Template
Let's jump in and see that combinational template in the game. This is the Verilog you will see when you open any intersection for the first time. Note that many of the comments included in the actual file in the game have been removed for viewing (these are wrapped with /* and */ and are ignored as human comments about the code).1. module light1 (clk, rst, outN, outS, outE, outW, sensor_light, general_sensors);
2. input clk, rst;
3. output [29:0]debug_port;
4. output [2:0]outN; /* For cars going north */
5. output [2:0]outS; /* For cars going south */
6. output [2:0]outE; /* For cars going east */
7. output [2:0]outW; /* For cars going west */
8. input [7:0] sensor_light;
9. input [29:0] general_sensors;
10. parameter Stop = 3'b000,
11. Forward_only = 3'b001,
12. Left_only = 3'b010,
13. Right_only = 3'b011,
14. Go = 3'b100;
15. reg [2:0]outN;
16. reg [2:0]outS;
17. reg [2:0]outE;
18. reg [2:0]outW;
19. assign debug_port = sensor_light;
20. always @(*)
21. begin
22. if ((sensor_light[0] == 1'b0) && (sensor_light[1] == 1'b0) && (sensor_light[2] == 1'b0) && (sensor_light[3] == 1'b0))
23. begin
24. if (sensor_light[6] == 1'b1)
25. begin
26. outN = Go;
27. outS = Stop;
28. outE = Stop;
29. outW = Stop;
30. end
31. else if (sensor_light[4] == 1'b1)
32. begin
33. outN = Stop;
34. outS = Go;
35. outE = Stop;
36. outW = Stop;
37. end
38. else if (sensor_light[5] == 1'b1)
39. begin
40. outN = Stop;
41. outS = Stop;
42. outE = Go;
43. outW = Stop;
44. end
45. else if (sensor_light[7] == 1'b1)
46. begin
47. outN = Stop;
48. outS = Stop;
49. outE = Stop;
50. outW = Go;
51. end
52. else
53. begin
54. outN = Go;
55. outS = Go;
56. outE = Go;
57. outW = Go;
58. end
59. end
60. else
61. begin
62. outN = Stop;
63. outS = Stop;
64. outE = Stop;
65. outW = Stop;
66. end
67. end
68. endmodule
Lines 1 through 14
These lines in RED should not be changed in verilogTown as they are used to simulate the game. However, we will describe what they do.Line 1 is the header for the circuit. It describes the inputs and outputs of a module just by name. The syntax (how the grammar should be written) is "module {name of the module} ( signals , signals, ... );". The word "module" and the punctuations (),; are a keyword and grammatical indicators that are restricted in use. {name of the module} can be any name and signals also can be any non-keyword that are start with a letter and are alpha numerical names that can include the "_" punctuation without spaces. For example, the following are legal names: "hello", "hell0", "hel_L0", and "H_3_L_l_0_". This naming convention is used for any designer created names.
Once the module has been described the next few lines describe if a signal is an input or output and how many bits it can hold. Line 2, for example, says that the signals "clk" and "rst" are inputs (going into the circuit) and are 1 bit wide (can only hold the value of 0 or 1 also known as False and True, respectively). Line 3 through 9 are similar to line 2, but they describe signals that are either input or outputs to the design and can hold multiple bits. Line 4 for example describes a signal named "outN" that can hold 3 bits of data. We would call this a binary number of 3 bits which means it can represent the following positive decimal decimal digits: 0, 1, 2, 3, 4, 5, 6, and 7 (see Binary for a better understanding of this idea).
Just so you understand what all these signals are we will describe them:
- clk = this is an input clock signal (controls the sequential logic if any) that is part of the game simulator. In the game the clock ticks at a rate of 25 Hz when you start simulating, which sort of means the dam will let water through 25 times per second.
- rst = this is an input signal that is turned off "0" and the on "1" at the beginning of the simulation to initialize sequential logic. This only matters for sequential circuits.
- debug_port = this port is a specific port that we include to help you debug your circuit. If you use our simulator in the editor to test how your Verilog will control the traffic light, you can use debug port to see the internals of your design. The size of this port is 30bits, which is the largest signal supported in verilogTown (see limitations for more restrictions).
- outN = this is
one of the output signals that controls the signal at a traffic light.
It is 3 bits and the game simulation uderstands the following
as light control outputs: Stop = 3'b000,
Forward_only
= 3'b001, Left_only = 3'b010, Right_only, and Go = 3'b100.
Note
that a car will respect the signal, but will not go, for example,
Right_only if this would cause the car to leave the road. In
particular, this controls the signal for a car going North.
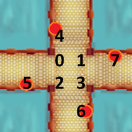
If a
traffic signal doesn't need a north signal (there is no northward
entrance road) you can just set outN to "Stop". Below is an
example of such an intersection:

- outS, outE, outW = these are similar to "outN" but for the lights for cars going south, east, and west, respectively.
- sensor_light = this is an input signal that is for the sensors at the traffic light that tell the Verilog circuit if a car is there or not. Which bit in the signal corresponds to which sensor in the traffic light is described in the comments. For example, sensor[4] is "1" when a car is at the traffic light and entering south bound. If there is no car at that sensor then the value will be "0".
- general_sensors = is a future feature of verilogTown and is unsupported at present.
Lines 15 through 18
The remainder of the file is written and modified by you. Lines 15 through 18 describe how the signals outN, outS, outE, and outW are used. The keyword "reg" tells us that these signals will be used on the left-hand-side of statements in an always block. See golden rule 1 for a better understanding of this.
Line 19
This line uses the keyword "assign" which describes a combinational statement. In this case the signal coming in (sensor_light) is sent out on the "debug_port". We would say the left-hand-side (LHS) signal "debug_port" has been assigned by the "=" (equal operator) the value of the right-hand-side (RHS). On the RHS, we could do something more complex such as addition, subtraction, logical AND, bitwise AND, etc. However, in this case we are just assigning an input to an output. This is done on the sequential example.
Line 20
Line 20 is the start of what is called an always block. The word "always" is a keyword in Verilog and can be interpreted as "always evaluate everything in my block". From our perspective, if the block (a block is surrounded with begin and end keywords) is combinational it will be identified by "always @(*)". Therefore, this is one of two possible ways to define an always block for verilogTown. We will see the sequential way of defining an always block later. Note, verilogTown will only accept combinational always blocks in the form "always @(*)".
Line 21 and 67
These are the "begin" and "end" keywords that wrap the block associated with the always block.
Line 22 and Line 60
Line 22 is the start of what is called an "if" statement. An "if" statement is a control statement that is used to control whether something should happen. In this case if the expression described in between the round brackets ( ) is true then the description between line 23 and 59 will be evaluated. If the expression is false then the statements between lines 61 and 66 will be evaluated. This combination is called an "if-then-else".
The expression on Line 22 is:
(sensor_light[0] == 1'b0) && (sensor_light[1] == 1'b0) && (sensor_light[2] == 1'b0) && (sensor_light[3] == 1'b0)
Let's look at the first part:
(sensor_light[0] == 1'b0)
This is a sub-expression that is true (equal to 1) if the signal sensor_light[0] is equal to the binary value 0. In terms of the game, this means that there is no car currently at the top left inner road of this particular traffic light. This is repeated for each of the portions of the inner traffic light in the following three inner sensors. Each sub-expression is joined together with the operator &&, which is a logical and operation. The entire expression might be read as "there is no car at sensor 0 AND there is no car at sensor 1 and there is no sensor at sensor 2 AND there is no car at sensor 3". If this is true then we'll execute the if portion. If it is not true (which means false) we execute the else part, which basically turns all the lights to Stop (see below).
How do we know which sensor_light bit corresponds to which traffic light sensor? It's described in the comments and you can also look at the following:
Lines 24, 31, 38, and 45
Assuming that the if-then-else just described evaluates to true which means there are no cars in the intersection, then we evaluate the embedded if-elseif-elseif-elseif-else structure. This is called a nested if structure because it is wrapped by the if-then-else control structure. (In real designs this can result in very long wires which can cause timing problems! Here, we don't have to worry about this, but keep it in mind as you build real circuits.)
Line 24 starts this with a the if expression:
if (sensor_light[6] == 1'b1)
This asks if there is a car waiting at the traffic light that wants to go north determined by reading the sensor. If there is (or it evaluates to true), then lines 26 through 29 are evaluated. Lines 26 through 29 are similar to the assign statement we saw earlier, but in this case they assign the parameter values to the traffic output signals, and in this case, we set the go North signal to Go and all the other lights to Stop.
If the If statement is false then line 31 is evaluated which is an "else if" which checks if there is a car going south. If that is true then the South light is set to Go and all the rest are set to Stop. This process is repeated for each direction.
Note, that the order of if-else if-else means that for this design, the cars going north will have priority over other directions.
Line 68
The key word here is "endmodule" which tells the Verilog compiler that this is the end of the module description.
Discussion of the Combinational Template
By reading the above you should come out with the understanding that the combinational Verilog code looks at a traffic light and if there are no cars currently moving through the traffic light then the a car is allowed to Go in the priority of northbound, southbound, eastbound, and finally, westbound.
One questions you might be asking is, "Why do you need to define what all N, S, E, and W signals in every instance?" If you are familiar with sequential programming languages such as C or Java then this might appear strange. In Verilog, you have to understand that you are "describing a circuit" and not writing a series of steps that will be executed one after another. This means that the code describes a parallel execution (as in everything happens at the same time). This is a BIG difference, and therefore, in a combinational always block, you need to set the output of every signal in it for all possible situations. In verilogTown this might not hurt you since the design is simulated, but in a tool such as Quartus (Altera's tool) you will get warnings of "inferred latches". These are BAD unless you really want such things (you, likely, don't). To avoid these, in any combinational always block assign the LHS signals in every possible case and use "else" and "default:" statements (default is part of a case statement).
Also, to illustrate the parallel aspect a little more look at the following Verilog:
1. A = 2;
2. B = A + 1;
In sequential programming languages, the value of B would be 3 since statement 1 happens and then statement 2. This is not the case in Verilog. Both statements happen simultaneously, and therefore, the value of B depends on previous state. That means combinational logic is not good for the above statements, and sequential logic will help us in this regard.